
Table of Contents
I’ll show how to capture packets on a local network with Pcap4J container.
Docker network
By default, Docker containers are not connected to a local network. They are connected only to a virtual network Docker creates as like below:
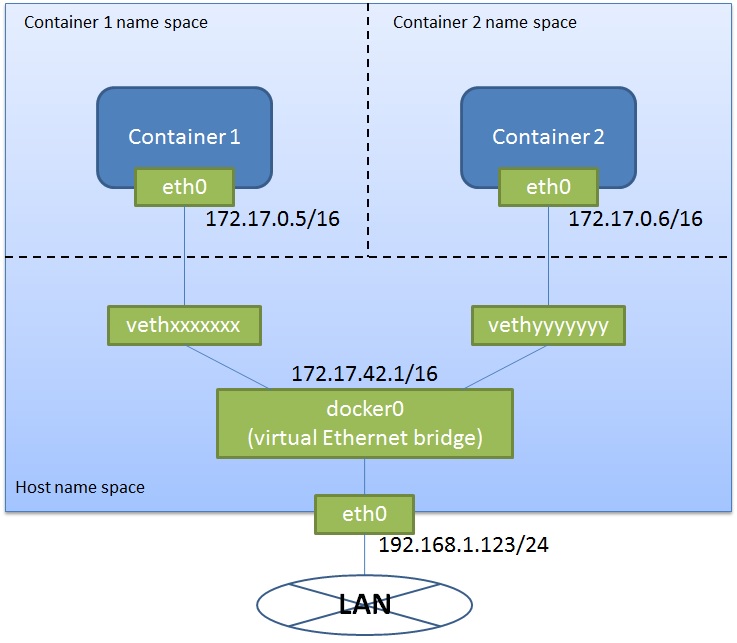
Refer to the Docker doc for more details.
What’s a challenge
In order to let a Pcap4J container capture packets in a local (real) network, we need to directly connect the container to the local network, because docker0 forwards only packets the destinations of which are in the virtual network.
How to do it is explained in some articles. I referred to one of them, Four ways to connect a docker container to a local network in Odd Bits blog, and succeeded in local network capturing using the 4th way.
What I actually did is as follows.
What I did
Environment
OS: CentOS 7.0 (on VMware Player 7.1.0 on Windows 7)
# uname -a
Linux localhost.localdomain 3.10.0-229.el7.x86_64 #1 SMP Fri Mar 6 11:36:42 UTC 2015 x86_64 x86_64 x86_64 GNU/Linux
user: root
Pcap4J version: 1.5.1-SNAPSHOT
Docker version: 1.6.2
Network interfaces:
  # ip addr show
  1: lo: <LOOPBACK,UP,LOWER_UP> mtu 65536 qdisc noqueue state UNKNOWN
      link/loopback 00:00:00:00:00:00 brd 00:00:00:00:00:00
      inet 127.0.0.1/8 scope host lo
         valid_lft forever preferred_lft forever
      inet6 ::1/128 scope host
         valid_lft forever preferred_lft forever
  2: eth0: <BROADCAST,MULTICAST,UP,LOWER_UP> mtu 1500 qdisc pfifo_fast state UP qlen 1000
      link/ether 00:0c:29:8e:95:27 brd ff:ff:ff:ff:ff:ff
      inet 192.168.1.123/24 brd 192.168.1.255 scope global dynamic eth0
         valid_lft 85975sec preferred_lft 85975sec
      inet6 2601:282:8102:2623:20c:29ff:fe8e:9527/64 scope global dynamic
         valid_lft 221469sec preferred_lft 221469sec
      inet6 fe80::20c:29ff:fe8e:9527/64 scope link
         valid_lft forever preferred_lft forever
  3: docker0: <NO-CARRIER,BROADCAST,MULTICAST,UP> mtu 1500 qdisc noqueue state DOWN
      link/ether 56:84:7a:fe:97:99 brd ff:ff:ff:ff:ff:ff
      inet 172.17.42.1/16 scope global docker0
         valid_lft forever preferred_lft forever
- Prerequisites:
- Docker is installed and Docker service is started
- nsenter
Step by step
Preparing
Create a utility script
docker-pidwith the following content and place it somewhere in thePATH.#!/bin/sh exec docker inspect --format '{{ .State.Pid }}' "$@"This script show the PID of a docker container by name or ID.
Pull the latest Pcap4J image
# docker pull kaitoy/pcap4jStart a Pcap4J container with wait mode
# docker run --name pcap4j-br kaitoy/pcap4j:latest eth1 trueThis container (
pcap4j-br) waits for a ping toeth0on the container before staring capturing packets witheth1on the container. After the container starts, you will see messages like below:17:49:21.196 [main] INFO org.pcap4j.core.Pcaps - 3 NIF(s) found. eth0 (null) IP address: /172.17.0.3 IP address: /fe80:0:0:0:42:acff:fe11:3The messages say IP address of
eth0is172.17.0.3. We will use it later.Configure a bridge interface
Open another terminal and do the following:
# ip link add eth1 link eth0 type macvlan mode bridge
# ip link set netns $(docker-pid pcap4j-br) eth1
# nsenter -t $(docker-pid pcap4j-br) -n ip link set eth1 up
# nsenter -t $(docker-pid pcap4j-br) -n ip route del default
# nsenter -t $(docker-pid pcap4j-br) -n ip addr add 192.168.1.200/24 dev eth1
# nsenter -t $(docker-pid pcap4j-br) -n ip route add default via 192.168.1.1 dev eth1
The above commands 1) add an interface
eth1bridged toeth0to the Docker host machine, 2) move theeth1to the name space ofpcap4j-br, 3) starteth1, 4) delete the default route inpcap4j-br, 5) add an IP address192.168.1.200/24toeth1, 6) and set the default route inpcap4j-brto192.168.1.1.Too much hassle? I agree. Let’s use an awesome tool, pipework. This tool accomplishes the above 6 steps in easier way as shown below:
# git clone https://github.com/jpetazzo/pipework.git
# cd pipework
# ./pipework eth0 pcap4j-br 192.168.1.200/[email protected]
pipework uses
ip netns execcommand instead ofnsenterto manipulate a container. Incidentally,docker execdidn’t work for the step 3 due to an error “RTNETLINK answers: Operation not permitted”.In addition, in my case, because I was doing it on a VMware VM, I needed to enable the promiscuous mode of
eth0(on the docker host machine) as follows:# ip link set dev eth0 promisc onTry to poke the container
You can now communicate with
pcap4j-brusingeth1from another host. I tried some pings from the VM’s host topcap4j-brand saw replies.Note that you can NOT communicate with
pcap4j-brviaeth1from the docker host. See the Odd Bits blog for the details.Start packet capturing
Ping to
eth0ofpcap4j-brform the docker host to start packet capturing.# ping -c 1 172.17.0.3