Table of Contents
「Kubernetes 1.8が出たので、Minikubeを触ってみる」でMinikubeをやったんだけど、もう一歩ステップアップすべく、kubeadmでKubernetesクラスタを組んでみた話。
kubeadmとは
kubeadm(キューブアダム)はKubernetesに含まれるコマンドで、Kubernetesクラスタを簡単に構築するツール。 Kubernetes 1.4で追加され、Kubernetes 1.8の時点でまだベータで、本番環境には使わないでとなっている。 Qiitaの「kubeadmが何をやっているのかみてみた」という記事が、中でどんな動作をしてるかを解説していて参考になる。
コマンドの使用感からすると、DockerのSwarmモードでのクラスタ構築の容易さをKubernetesに取り込むことを目指して開発されている気がした。
ネットで見かけた評判だと、確かに簡単にクラスタ構築できて素晴らしいけど、TLSの証明書生成など、細かく制御できなくて困るところがあって、やはり本番に使えるレベルではないとのこと。
まあとにかく試してみる価値はあろう。
kubeadmインストール
Kubernetesのドキュメントに従ってkubeadmをインストールする。 バージョンは最新版の1.8.1。
VM作成
kubeadmのサポートOSは、Ubuntu 16.04+、Debian 9、CentOS 7、RHEL 7、Fedora 25/26、HypriotOS v1.0.1+となっている。 慣れているCentOS 7を使うことにする。 (HypriotOSってなんだろう?)
自前のノートPCのWindows 10 x64 Home Edition上のVMware Player 12のVMにCentOS 7を入れた。 メモリは1GB以上が要件なので、味を付けて1.4GBで。 VM間で通信できることって要件があったけど、インターネット接続も必要なはずなので、NICはNATのやつで。
このVMはMasterになる。
OS設定
Kubernetesが使うポートをいろいろ開けなければいけないんだけど、めんどいのでfirewalldを無効にする。
# systemctl stop firewalld
# systemctl disable firewalld
Removed symlink /etc/systemd/system/multi-user.target.wants/firewalld.service.
Removed symlink /etc/systemd/system/dbus-org.fedoraproject.FirewallD1.service.
なんとなくIPアドレスをDHCPから静的割り当てに。(192.168.171.200)
# nmcli c modify ens33 ipv4.method manual
# nmcli c modify ens33 ipv4.addresses 192.168.171.200/24
# nmcli c modify ens33 ipv4.dns 192.168.171.2
# nmcli c modify ens33 ipv4.gateway 192.168.171.2
# systemctl restart network
ホスト名をlocalhost.localdomainからk8s-masterに変更。
# hostnamectl set-hostname k8s-masterログアウトログインで反映。
/etc/hostsを編集して、k8s-masterのエントリを追加。
あとで作るもう一つのVM、k8s-nodeのほうもエントリを追加。
(これはだめだったっぽい。詳細は後述。)
クラスタを構成するノードは、一意のMACアドレスとproduct_uuidを持っていないといけない。 Kubernetesがそれらでクラスタ内のノードを区別してるので。
MACアドレスはip linkコマンドなどで確認できる。
# ip link
1: lo: <LOOPBACK,UP,LOWER_UP> mtu 65536 qdisc noqueue state UNKNOWN mode DEFAULT qlen 1
    link/loopback 00:00:00:00:00:00 brd 00:00:00:00:00:00
2: ens33: <BROADCAST,MULTICAST,UP,LOWER_UP> mtu 1500 qdisc pfifo_fast state UP mode DEFAULT qlen 1000
link/ether 00:0c:29:38:de:ae brd ff:ff:ff:ff:ff:ffproduct_uuidは、SMBIOSという、PC固有のデータを保存・参照するための仕様があって、それに従って保存されたシステムの識別子らしい。
product_uuidはdmidecodeコマンドなどで確認できる。
# dmidecode -s system-uuid
58114D56-A744-3610-C3C5-9B15A838DEAE
kubeletがちゃんと動くためにはswapを無効にする必要がある。
# swapoff -a(このコマンドはよくなかった。詳細は後述。)
ebtablesとethtoolを入れる必要がある。
# yum install -y ebtables ethtoolDockerも入れないと。 v1.12が推奨で、v1.11かv1.13でもいい。 適当に入れたらv1.12.6だった。
# yum install -y docker
# systemctl enable docker && systemctl start docker
Podネットワークなどが機能する要件として、コンテナがホストファイルシステムにアクセスできる必要があるが、そのためには現状、SELinuxを無効化する必要がある。
# setenforce 0(このコマンドもよくなかった。詳細は後述。)
RHEL系の場合、iptablesがバイパスされてトラフィックが変にルーティングされる問題があるため、net.bridge.bridge-nf-call-iptablesを1にセットしておく必要がある。
# cat <<EOF >  /etc/sysctl.d/k8s.conf
net.bridge.bridge-nf-call-ip6tables = 1
net.bridge.bridge-nf-call-iptables = 1
EOF
# sysctl --system
* Applying /usr/lib/sysctl.d/00-system.conf ...
net.bridge.bridge-nf-call-ip6tables = 0
net.bridge.bridge-nf-call-iptables = 0
net.bridge.bridge-nf-call-arptables = 0
* Applying /usr/lib/sysctl.d/10-default-yama-scope.conf ...
kernel.yama.ptrace_scope = 0
* Applying /usr/lib/sysctl.d/50-default.conf ...
kernel.sysrq = 16
kernel.core_uses_pid = 1
net.ipv4.conf.default.rp_filter = 1
net.ipv4.conf.all.rp_filter = 1
net.ipv4.conf.default.accept_source_route = 0
net.ipv4.conf.all.accept_source_route = 0
net.ipv4.conf.default.promote_secondaries = 1
net.ipv4.conf.all.promote_secondaries = 1
fs.protected_hardlinks = 1
fs.protected_symlinks = 1
* Applying /usr/lib/sysctl.d/99-docker.conf ...
fs.may_detach_mounts = 1
* Applying /etc/sysctl.d/99-sysctl.conf ...
* Applying /etc/sysctl.d/k8s.conf ...
net.bridge.bridge-nf-call-ip6tables = 1
net.bridge.bridge-nf-call-iptables = 1
* Applying /etc/sysctl.conf ...
Cgroup Driverを、Dockerとkubeletとの間で一致させておく必要がある。 以下のようにして確認できる。
# cat /etc/systemd/system/kubelet.service.d/10-kubeadm.conf | grep KUBELET_CGROUP_ARGS
Environment="KUBELET_CGROUP_ARGS=--cgroup-driver=systemd"
ExecStart=/usr/bin/kubelet $KUBELET_KUBECONFIG_ARGS $KUBELET_SYSTEM_PODS_ARGS $KUBELET_NETWORK_ARGS $KUBELET_DNS_ARGS $KUBELET_AUTHZ_ARGS $KUBELET_CADVISOR_ARGS $KUBELET_CGROUP_ARGS $KUBELET_CERTIFICATE_ARGS $KUBELET_EXTRA_ARGS
# docker info |grep -i cgroup
 WARNING: Usage of loopback devices is strongly discouraged for production use. Use `--storage-opt dm.thinpooldev` to specify a custom block storage device.
Cgroup Driver: systemd
どっちもsystemdだったので問題なし。
(違ってたらKUBELET_CGROUP_ARGSを変更する必要がある。)
kubelet、kubeadm、kubectlインストール
ここでやっとkubeadmのインストール。 kubeletとkubectlも一緒にインストールする。
まずYUMリポジトリを追加して、
# cat <<EOF > /etc/yum.repos.d/kubernetes.repo
[kubernetes]
name=Kubernetes
baseurl=https://packages.cloud.google.com/yum/repos/kubernetes-el7-x86_64
enabled=1
gpgcheck=1
repo_gpgcheck=1
gpgkey=https://packages.cloud.google.com/yum/doc/yum-key.gpg
        https://packages.cloud.google.com/yum/doc/rpm-package-key.gpg
EOF
インストール。
# yum install kubelet kubeadm kubectlで、kubeletをサービス登録。
# systemctl enable kubelet && systemctl start kubelet
Created symlink from /etc/systemd/system/multi-user.target.wants/kubelet.service to /etc/systemd/system/kubelet.service.
ここでVMのスナップショットをとっておいて、後でNodeを追加するときに使う。
Master構築
Masterはkubeadm initで構築できる。
--apiserver-advertise-addressでkube-apiserverがlistenするIPアドレスを指定すべし。
# kubeadm init --apiserver-advertise-address=192.168.171.200
[kubeadm] WARNING: kubeadm is in beta, please do not use it for production clusters.
[init] Using Kubernetes version: v1.8.1
[init] Using Authorization modes: [Node RBAC]
[preflight] Running pre-flight checks
[preflight] WARNING: Running with swap on is not supported. Please disable swap or set kubelet's --fail-swap-on flag to false.
[kubeadm] WARNING: starting in 1.8, tokens expire after 24 hours by default (if you require a non-expiring token use --token-ttl 0)
[certificates] Generated ca certificate and key.
[certificates] Generated apiserver certificate and key.
[certificates] apiserver serving cert is signed for DNS names [k8s-master kubernetes kubernetes.default kubernetes.default.svc kubernetes.default.svc.cluster.local] and IPs [10.96.0.1 192.168.171.200]
[certificates] Generated apiserver-kubelet-client certificate and key.
[certificates] Generated sa key and public key.
[certificates] Generated front-proxy-ca certificate and key.
[certificates] Generated front-proxy-client certificate and key.
[certificates] Valid certificates and keys now exist in "/etc/kubernetes/pki"
[kubeconfig] Wrote KubeConfig file to disk: "admin.conf"
[kubeconfig] Wrote KubeConfig file to disk: "kubelet.conf"
[kubeconfig] Wrote KubeConfig file to disk: "controller-manager.conf"
[kubeconfig] Wrote KubeConfig file to disk: "scheduler.conf"
[controlplane] Wrote Static Pod manifest for component kube-apiserver to "/etc/kubernetes/manifests/kube-apiserver.yaml"
[controlplane] Wrote Static Pod manifest for component kube-controller-manager to "/etc/kubernetes/manifests/kube-controller-manager.yaml"
[controlplane] Wrote Static Pod manifest for component kube-scheduler to "/etc/kubernetes/manifests/kube-scheduler.yaml"
[etcd] Wrote Static Pod manifest for a local etcd instance to "/etc/kubernetes/manifests/etcd.yaml"
[init] Waiting for the kubelet to boot up the control plane as Static Pods from directory "/etc/kubernetes/manifests"
[init] This often takes around a minute; or longer if the control plane images have to be pulled.
[kubelet-check] It seems like the kubelet isn't running or healthy.
[kubelet-check] The HTTP call equal to 'curl -sSL http://localhost:10255/healthz' failed with error: Get http://localhost:10255/healthz: dial tcp [::1]:10255: getsockopt: connection refused.
[kubelet-check] It seems like the kubelet isn't running or healthy.
[kubelet-check] The HTTP call equal to 'curl -sSL http://localhost:10255/healthz' failed with error: Get http://localhost:10255/healthz: dial tcp [::1]:10255: getsockopt: connection refused.
[kubelet-check] It seems like the kubelet isn't running or healthy.
[kubelet-check] The HTTP call equal to 'curl -sSL http://localhost:10255/healthz' failed with error: Get http://localhost:10255/healthz: dial tcp [::1]:10255: getsockopt: connection refused.
[kubelet-check] It seems like the kubelet isn't running or healthy.
[kubelet-check] The HTTP call equal to 'curl -sSL http://localhost:10255/healthz/syncloop' failed with error: Get http://localhost:10255/healthz/syncloop: dial tcp [::1]:10255: getsockopt: connection refused.
[kubelet-check] It seems like the kubelet isn't running or healthy.
[kubelet-check] The HTTP call equal to 'curl -sSL http://localhost:10255/healthz/syncloop' failed with error: Get http://localhost:10255/healthz/syncloop: dial tcp [::1]:10255: getsockopt: connection refused.
[kubelet-check] It seems like the kubelet isn't running or healthy.
[kubelet-check] The HTTP call equal to 'curl -sSL http://localhost:10255/healthz/syncloop' failed with error: Get http://localhost:10255/healthz/syncloop: dial tcp [::1]:10255: getsockopt: connection refused.
[kubelet-check] It seems like the kubelet isn't running or healthy.
[kubelet-check] The HTTP call equal to 'curl -sSL http://localhost:10255/healthz' failed with error: Get http://localhost:10255/healthz: dial tcp [::1]:10255: getsockopt: connection refused.
[kubelet-check] It seems like the kubelet isn't running or healthy.
[kubelet-check] The HTTP call equal to 'curl -sSL http://localhost:10255/healthz/syncloop' failed with error: Get http://localhost:10255/healthz/syncloop: dial tcp [::1]:10255: getsockopt: connection refused.
[kubelet-check] It seems like the kubelet isn't running or healthy.
[kubelet-check] The HTTP call equal to 'curl -sSL http://localhost:10255/healthz' failed with error: Get http://localhost:10255/healthz: dial tcp [::1]:10255: getsockopt: connection refused.

Unfortunately, an error has occurred:
        timed out waiting for the condition

This error is likely caused by that:
        - The kubelet is not running
        - The kubelet is unhealthy due to a misconfiguration of the node in some way (required cgroups disabled)
        - There is no internet connection; so the kubelet can't pull the following control plane images:
                - gcr.io/google_containers/kube-apiserver-amd64:v1.8.1
                - gcr.io/google_containers/kube-controller-manager-amd64:v1.8.1
                - gcr.io/google_containers/kube-scheduler-amd64:v1.8.1

You can troubleshoot this for example with the following commands if you're on a systemd-powered system:
        - 'systemctl status kubelet'
        - 'journalctl -xeu kubelet'
couldn't initialize a Kubernetes cluster
なんか失敗した。
getsockopt: connection refused.ってのがたくさん出てる。
ググると、swapがあやしい。
確認してみたら、
# swapon -s
Filename                                Type            Size    Used    Priority
/dev/dm-1                               partition       2097148 0       -1
無効になってない。
swapoff -aでswap無効にしても、OS再起動したらもとに戻ってしまうのか。
永続的に無効にするため、/etc/fstabを編集して、以下の行を削除した。
/dev/mapper/centos-swap swap swap defaults 0 0で、OSリブート。
kubeadm initをやり直す前に、いったんkubeadm resetして初期化する。
# kubeadm reset
[preflight] Running pre-flight checks
[reset] Stopping the kubelet service
[reset] Unmounting mounted directories in "/var/lib/kubelet"
[reset] Removing kubernetes-managed containers
[reset] Deleting contents of stateful directories: [/var/lib/kubelet /etc/cni/net.d /var/lib/dockershim /var/run/kubernetes /var/lib/etcd]
[reset] Deleting contents of config directories: [/etc/kubernetes/manifests /etc/kubernetes/pki]
[reset] Deleting files: [/etc/kubernetes/admin.conf /etc/kubernetes/kubelet.conf /etc/kubernetes/controller-manager.conf /etc/kubernetes/scheduler.conf]2回目のkubeadm init。
# kubeadm init --apiserver-advertise-address=192.168.171.200
[kubeadm] WARNING: kubeadm is in beta, please do not use it for production clusters.
[init] Using Kubernetes version: v1.8.1
[init] Using Authorization modes: [Node RBAC]
[preflight] Running pre-flight checks
[preflight] Starting the kubelet service
[kubeadm] WARNING: starting in 1.8, tokens expire after 24 hours by default (if you require a non-expiring token use --token-ttl 0)
[certificates] Generated ca certificate and key.
[certificates] Generated apiserver certificate and key.
[certificates] apiserver serving cert is signed for DNS names [k8s-master kubernetes kubernetes.default kubernetes.default.svc kubernetes.default.svc.cluster.local] and IPs [10.96.0.1 192.168.171.200]
[certificates] Generated apiserver-kubelet-client certificate and key.
[certificates] Generated sa key and public key.
[certificates] Generated front-proxy-ca certificate and key.
[certificates] Generated front-proxy-client certificate and key.
[certificates] Valid certificates and keys now exist in "/etc/kubernetes/pki"
[kubeconfig] Wrote KubeConfig file to disk: "admin.conf"
[kubeconfig] Wrote KubeConfig file to disk: "kubelet.conf"
[kubeconfig] Wrote KubeConfig file to disk: "controller-manager.conf"
[kubeconfig] Wrote KubeConfig file to disk: "scheduler.conf"
[controlplane] Wrote Static Pod manifest for component kube-apiserver to "/etc/kubernetes/manifests/kube-apiserver.yaml"
[controlplane] Wrote Static Pod manifest for component kube-controller-manager to "/etc/kubernetes/manifests/kube-controller-manager.yaml"
[controlplane] Wrote Static Pod manifest for component kube-scheduler to "/etc/kubernetes/manifests/kube-scheduler.yaml"
[etcd] Wrote Static Pod manifest for a local etcd instance to "/etc/kubernetes/manifests/etcd.yaml"
[init] Waiting for the kubelet to boot up the control plane as Static Pods from directory "/etc/kubernetes/manifests"
[init] This often takes around a minute; or longer if the control plane images have to be pulled.

Unfortunately, an error has occurred:
        timed out waiting for the condition

This error is likely caused by that:
        - The kubelet is not running
        - The kubelet is unhealthy due to a misconfiguration of the node in some way (required cgroups disabled)
        - There is no internet connection; so the kubelet can't pull the following control plane images:
                - gcr.io/google_containers/kube-apiserver-amd64:v1.8.1
                - gcr.io/google_containers/kube-controller-manager-amd64:v1.8.1
                - gcr.io/google_containers/kube-scheduler-amd64:v1.8.1

You can troubleshoot this for example with the following commands if you're on a systemd-powered system:
        - 'systemctl status kubelet'
        - 'journalctl -xeu kubelet'
couldn't initialize a Kubernetes cluster
また違う感じのエラー。
エラーメッセージに従って、journalctl -xeu kubeletでログを見てみたら、以下のようなエラーが。
Post https://192.168.171.200:6443/api/v1/nodes: dial tcp 192.168.171.200:6443: getsockopt: connection refusedkubeadmにIssueにこのエラーが載っている。 原因はいろいろあるっぽいけど、そのひとつにSELinuxがあったので確認してみたら、
# getenforce
Enforcing
SELinuxが有効になっていた。
setenforce 0もOS再起動で元に戻ってしまった模様。
永続的にSELinuxを無効にするため、/etc/selinux/configを編集して、SELINUXをdisabledにして、OS再起動した。
で、kubeadm resetしたら3回目のkubeadm initする。
# kubeadm init --apiserver-advertise-address=192.168.171.200
[kubeadm] WARNING: kubeadm is in beta, please do not use it for production clusters.
[init] Using Kubernetes version: v1.8.1
[init] Using Authorization modes: [Node RBAC]
[preflight] Running pre-flight checks
[kubeadm] WARNING: starting in 1.8, tokens expire after 24 hours by default (if you require a non-expiring token use --token-ttl 0)
[certificates] Generated ca certificate and key.
[certificates] Generated apiserver certificate and key.
[certificates] apiserver serving cert is signed for DNS names [k8s-master kubernetes kubernetes.default kubernetes.default.svc kubernetes.default.svc.cluster.local] and IPs [10.96.0.1 192.168.171.200]
[certificates] Generated apiserver-kubelet-client certificate and key.
[certificates] Generated sa key and public key.
[certificates] Generated front-proxy-ca certificate and key.
[certificates] Generated front-proxy-client certificate and key.
[certificates] Valid certificates and keys now exist in "/etc/kubernetes/pki"
[kubeconfig] Wrote KubeConfig file to disk: "admin.conf"
[kubeconfig] Wrote KubeConfig file to disk: "kubelet.conf"
[kubeconfig] Wrote KubeConfig file to disk: "controller-manager.conf"
[kubeconfig] Wrote KubeConfig file to disk: "scheduler.conf"
[controlplane] Wrote Static Pod manifest for component kube-apiserver to "/etc/kubernetes/manifests/kube-apiserver.yaml"
[controlplane] Wrote Static Pod manifest for component kube-controller-manager to "/etc/kubernetes/manifests/kube-controller-manager.yaml"
[controlplane] Wrote Static Pod manifest for component kube-scheduler to "/etc/kubernetes/manifests/kube-scheduler.yaml"
[etcd] Wrote Static Pod manifest for a local etcd instance to "/etc/kubernetes/manifests/etcd.yaml"
[init] Waiting for the kubelet to boot up the control plane as Static Pods from directory "/etc/kubernetes/manifests"
[init] This often takes around a minute; or longer if the control plane images have to be pulled.
[apiclient] All control plane components are healthy after 99.510003 seconds
[uploadconfig]?Storing the configuration used in ConfigMap "kubeadm-config" in the "kube-system" Namespace
[markmaster] Will mark node k8s-master as master by adding a label and a taint
[markmaster] Master k8s-master tainted and labelled with key/value: node-role.kubernetes.io/master=""
[bootstraptoken] Using token: 957b7b.eaaf0cb656edba7b
[bootstraptoken] Configured RBAC rules to allow Node Bootstrap tokens to post CSRs in order for nodes to get long term certificate credentials
[bootstraptoken] Configured RBAC rules to allow the csrapprover controller automatically approve CSRs from a Node Bootstrap Token
[bootstraptoken] Configured RBAC rules to allow certificate rotation for all node client certificates in the cluster
[bootstraptoken] Creating the "cluster-info" ConfigMap in the "kube-public" namespace
[addons] Applied essential addon: kube-dns
[addons] Applied essential addon: kube-proxy

Your Kubernetes master has initialized successfully!

To start using your cluster, you need to run (as a regular user):

  mkdir -p $HOME/.kube
  sudo cp -i /etc/kubernetes/admin.conf $HOME/.kube/config
  sudo chown $(id -u):$(id -g) $HOME/.kube/config

You should now deploy a pod network to the cluster.
Run "kubectl apply -f [podnetwork].yaml" with one of the options listed at:
  http://kubernetes.io/docs/admin/addons/

You can now join any number of machines by running the following on each node
as root:

  kubeadm join --token 957b7b.eaaf0cb656edba7b 192.168.171.200:6443 --discovery-token-ca-cert-hash sha256:7d16ade2b651ebac573368b1b4db5c0f1236979584e61833efe90a96ff34ae2e
できた。 このメッセージの最後に書かれたコマンドを、後でNodeを追加するときに使う。
kubectlがこのVM上のkube-apiserverと話せるように、コンテキストを設定する。
# mkdir -p $HOME/.kube
# cp -i /etc/kubernetes/admin.conf $HOME/.kube/config
# chown $(id -u):$(id -g) $HOME/.kube/config
# kubectl get nodes
NAME         STATUS     ROLES     AGE       VERSION
k8s-master   NotReady   master    16m       v1.8.1
Podネットワークアドオンインストール
Podネットワークはアプリのデプロイの前にセットアップしておく必要がある。
多くの選択肢があるなか、有名なFlannelにしようと思ったけど、Flannelを使うには
kubeadm init時に--pod-network-cidr=10.244.0.0/16を渡さないといけなかった。
やり直すのは面倒なので代わりにWeave Netにする。
# export kubever=$(kubectl version | base64 | tr -d '\n')
# kubectl apply -f "https://cloud.weave.works/k8s/net?k8s-version=$kubever"
serviceaccount "weave-net" created
clusterrole "weave-net" created
clusterrolebinding "weave-net" created
daemonset "weave-net" created
これでPodネットワークアドオンインストール完了。
しばらくして、kube-dnsのPodが起動していれば(i.e. STATUSがRunningになってれば)OK。
# kubectl get pods --all-namespaces
NAMESPACE     NAME                                 READY     STATUS    RESTARTS   AGE
kube-system   etcd-k8s-master                      1/1       Running   0          1m
kube-system   kube-apiserver-k8s-master            1/1       Running   0          1m
kube-system   kube-controller-manager-k8s-master   1/1       Running   0          1m
kube-system   kube-dns-545bc4bfd4-xtlnh            3/3       Running   0          6m
kube-system   kube-proxy-922wk                     1/1       Running   0          6m
kube-system   kube-scheduler-k8s-master            1/1       Running   0          1m
kube-system   weave-net-s2kkw                      2/2       Running   0          2m
MasterにPodをデプロイさせる設定
デフォルトでは、セキュリティの都合でMasterコンポーネントが動くNodeにはPodがデプロイされない。 けど、VM2個でPodを分散デプロイしてみたいので、この縛りを外しておく。
# kubectl taint nodes --all node-role.kubernetes.io/master-
node "k8s-master" untainted
以上でMasterのセットアップは完了。
Node追加
次にNodeをひとつ追加する。
k8s-masterでkubeadm initするまえに撮ったスナップショットをクローンして、ホスト名とIPアドレスを変更し、これを追加するNodeのマシン(k8s-node)にする。
クローンしたらMACアドレスもproduct_uuidも変わったので、問題なく使えそう。
k8s-nodeをクラスタに追加するには、このVM上で、kubeadm init成功時のメッセージの最後に表示されたコマンド(i.e. kubeadm join)を実行するだけ。
# kubeadm join --token 957b7b.eaaf0cb656edba7b 192.168.171.200:6443 --discovery-token-ca-cert-hash sha256:7d16ade2b651ebac573368b1b4db5c0f1236979584e61833efe90a96ff34ae2e
[kubeadm] WARNING: kubeadm is in beta, please do not use it for production clusters.
[preflight] Running pre-flight checks
[discovery] Trying to connect to API Server "192.168.171.200:6443"
[discovery] Created cluster-info discovery client, requesting info from "https://192.168.171.200:6443"
[discovery] Requesting info from "https://192.168.171.200:6443" again to validate TLS against the pinned public key
[discovery] Cluster info signature and contents are valid and TLS certificate validates against pinned roots, will use API Server "192.168.171.200:6443"
[discovery] Successfully established connection with API Server "192.168.171.200:6443"
[bootstrap] Detected server version: v1.8.1
[bootstrap] The server supports the Certificates API (certificates.k8s.io/v1beta1)

Node join complete:
* Certificate signing request sent to master and response
  received.
* Kubelet informed of new secure connection details.

Run 'kubectl get nodes' on the master to see this machine join.
できた。 k8s-masterでNodeの状態を確認する。
# kubectl get nodes
NAME         STATUS    ROLES     AGE       VERSION
k8s-master   Ready     master    42m       v1.8.1
k8s-node     Ready     <none>    45s       v1.8.1
k8s-masterもk8s-nodeもReady。
VMホストのkubectlの設定
kubectlはkube-apiserverのWeb APIを呼ぶコマンドなので、接続先さえちゃんと設定すればMasterのマシン上でなくても使える。 VMのホスト(i.e. Windows 10 PC)で使えるようにしたい。
kubectlの接続先情報は、kubeadm init時に生成された/etc/kubernetes/admin.confに書かれているので、これをホストに持ってきてkubectlに渡してやればいい。
C:\Users\kaitoy\Desktop>kubectl --kubeconfig admin.conf get nodes
NAME         STATUS    ROLES     AGE       VERSION
k8s-master   Ready     master    51m       v1.8.1
k8s-node     Ready     <none>    10m       v1.8.1
できた。
admin.confを%UserProfile%\.kube\の下にconfigという名前で置いてやると、--kubeconfigで指定しなくても読んでくれる。
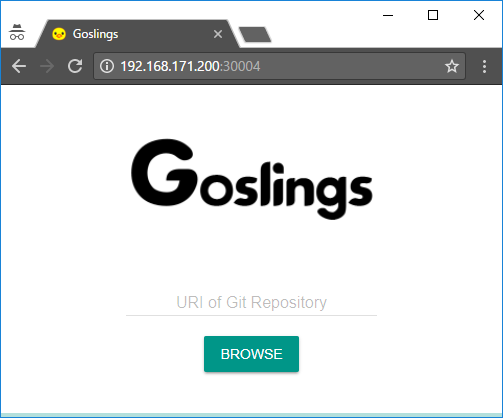
Goslingsデプロイ
「Kubernetesのチュートリアルをやる」の番外編で作ったオブジェクト定義ファイルを使って、今回作ったクラスタにGoslingsをデプロイしてみる。
C:\Users\kaitoy\Desktop>kubectl --kubeconfig admin.conf create -f deploy_goslings.yml
deployment "goslings-sample" created

C:\Users\kaitoy\Desktop>kubectl --kubeconfig admin.conf create -f service_goslings.yml
service "goslings-sample" created

C:\Users\kaitoy\Desktop>kubectl --kubeconfig admin.conf get po -o wide
NAME                              READY     STATUS    RESTARTS   AGE       IP           NODE
goslings-sample-dfd84c69c-4mgh9   1/1       Running   0          12m       10.244.1.3   k8s-node
goslings-sample-dfd84c69c-cd5mm   1/1       Running   0          12m       10.244.0.3   k8s-master
goslings-sample-dfd84c69c-nwwh7   1/1       Running   0          12m       10.244.1.2   k8s-node

C:\Users\kaitoy\Desktop>kubectl --kubeconfig admin.conf get svc
NAME              TYPE        CLUSTER-IP       EXTERNAL-IP   PORT(S)          AGE
goslings-sample   NodePort    10.109.174.204   <none>        8080:30004/TCP   7m
kubernetes        ClusterIP   10.96.0.1        <none>        443/TCP          1h
普通にデプロイできた。 レプリカ3つがちゃんと2つのNodeに分散されてる。
k8s-masterのIPアドレス( http://192.168.171.200:30004/ )でもk8s-nodeのIPアドレス( http://192.168.171.201:30004/ )でもGoslingsにつなげた。 普通はMasterのIPアドレスを使うらしい。 そりゃそうか。
試しにk8s-nodeのVMを落としてみる。 k8s-node上のPodがk8s-masterに移動してくれることを期待してたけど、
C:\Users\kaitoy\Desktop>kubectl --kubeconfig admin.conf get po -o wide
NAME                              READY     STATUS    RESTARTS   AGE       IP           NODE
goslings-sample-dfd84c69c-4mgh9   1/1       Running   0          55m       10.244.1.3   k8s-node
goslings-sample-dfd84c69c-cd5mm   1/1       Running   0          55m       10.244.0.3   k8s-master
goslings-sample-dfd84c69c-nwwh7   1/1       Running   0          55m       10.244.1.2   k8s-node
なんかk8s-nodeで動き続けていることになってる。
クラスタうまく動いていないんだろうか…
ダッシュボードデプロイ
Kubernetesクラスタの状態をWeb UIで確認できる、Dashboardをデプロイしてみる。
C:\Users\kaitoy\Desktop>kubectl --kubeconfig admin.conf apply -f https://raw.githubusercontent.com/kubernetes/dashboard/master/src/deploy/recommended/kubernetes-dashboard.yaml
secret "kubernetes-dashboard-certs" created
serviceaccount "kubernetes-dashboard" created
role "kubernetes-dashboard-minimal" created
rolebinding "kubernetes-dashboard-minimal" created
deployment "kubernetes-dashboard" created
service "kubernetes-dashboard" created
できた。
Dashboardが起動するまでしばらくまってから、kubectl proxyして、
http://localhost:8001/api/v1/namespaces/kube-system/services/https:kubernetes-dashboard:/proxy/にブラウザでつなげばGUIが開くはずなんだけど、タイムアウトしてつながらなかった。
クラスタうまく動いていないんだろうか…
NICがNATなのがだめだったかもと思い、ブリッジにしてみたけど同じ結果だった。 PodのフェールオーバーもしないしDashboardも開けない。
ちゃんと一つ一つ自分で構築しないとよく分からないな。
(後日全手動で構築した。)
あとでふと思い立って、/etd/hostsをいじったらDashboardは動いた。
それについてはまた別の記事で。